Saturday, 2 January 2016

A Vivid Hue Holiday Recap

I have been negligent in blogging this holiday so I have decided to give you a "Reader's Digest" update via instagram photos.  This was Vivid Hue Home's first holiday season as a gift boutique and it was such a wonderful and fulfilling season.  We have quite a loyal customer base locally and I'm so grateful to the regulars that stop in to see what we have to offer.  

One dilemma I faced in the fall was deciding when to decorate the cottage for Christmas.  Each year, Christmas trees go into retail stores earlier and earlier and there seems to be a real trend to kick off the season just after October.  I slowly started introducing some holiday-related items inside the store around early November and fought the urge to fully decorate until mid November.  


Our little cottage is perfect for New England greenery and berries, red ribbons and white lights.  


Our ombre turquoise Christmas tree with fuchsia boa feathers.


Antlers and plaid stockings over the fireplace! 


It was thrilling to see customers repost their Christmas goodies on instagram and tag us in them! 


Early in the season, Melissa Cole (who is a reporter for Better Connecticut) approached me about filming a few DIY segments in the shop for the holidays.  Of course, I jumped at the opportunity.  She came to the shop with her cameraman and we filmed two episodes back to back.  The entire filming took less than two hours and the result was two clips to appear on future episodes.  


It's funny how things happen in "threes."   Literally the day after my Better Connecticut filming,   Kerri-Lee Mayland (who is an anchor on NBC's Connecticut) visited the shop as a customer and loved the products so much that she asked me to appear live on air to provide holiday gift suggestions for viewers.   I almost got trumped by a special report from Obama, but luckily was able to squeeze my segment in before the report began.  Watch the segment here.  


Here I am with Kerri-Lee Mayland.  

Some of the gifts we offered as stocking stuffers.  


My "other half" is so into Star Wars that he insisted I purchase Star Wars  products for the store before the movie release.  


In fact, his birthday is a week before Christmas and he received mostly Star Wars-related gifts, including a life size R2D2 trash can and an original 1977 vintage Chewbaca stein.  We even took the kids out of school early on the movie release day.  


We sold traditional Christmas items, like these wood-carved Santas.  

There was a red and green theme of products...in fact, these gurgles were a popular gift item.  


And then the S'well bottles!  We started carrying them in every single size offered and they literally flew off the shelves.  These are so convenient and the large size will hold an entire bottle of wine (which was often a convincing reason for purchase)  


Of course, in Vivid Hue fashion of mixing patterns, why not mix cheetah and plaid? 


Professionally, it was a stellar first Holiday Season for the store.  And personally, it was such a terrific  year with family.  

Boston for Thanksgiving to visit the in-laws.  


Off to see "Rudolph" at the Bushnell in Hartford Connecticut.  


Some preppy red and pink decorations in my home.   We sell these elephant planters @vividhuehome and I have used them every single season to make a statement on the dining room table.  (PS, ignore the dead looking holly on the left).


Our pink and green mudroom decked out for a neighborhood get together.  


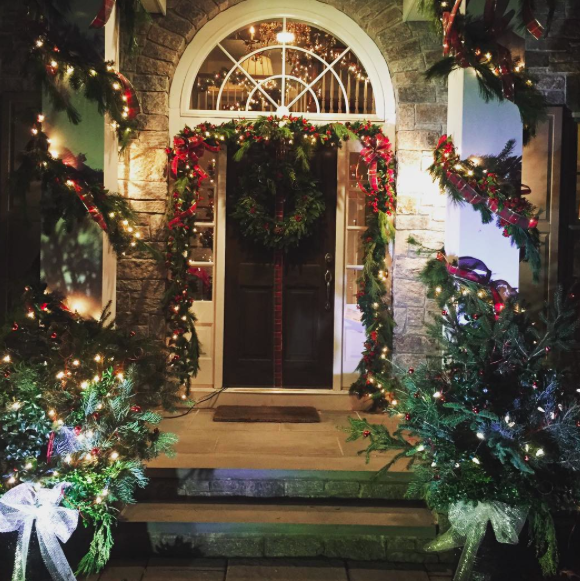
Front of house with fresh greenery and lights 

We go over the top with Christmas trees, including one in our master bedroom.  


One of the felt ornaments I made EG when we were engaged and I was still in NYC and he was in Boston.   This little guy is 12 years old. 


We spent Christmas in Northern Virginia at my parent's house.


We visited our old stomping grounds in Georgetown, where we got married.  Here is the entry path leading down to Sequoias.


We took the kids to the Smithsonians...their first real year of understanding what they were seeing (e.g. the original United States Flag, the Bureau of Engraving and printing where money is made)


We enjoyed lunch in DC before settling in at my parent's house with our entire family.  


And to think that the year has come to an end and we are off running with 2016.


Thank you to all of my readers and (now customers) who have supported the launch of the store this year.  For regular updates, please follow vivid hue on Instagram.  I have started posting individual photos of our products in the shop and local customers can keep track of what we have to offer.

May you and your family have a healthy and happy new year.

Cheers,
Heather


Friday, 1 January 2016

DIY: How to Make a Holiday Fruit Tree

I grew up in Northern Virginia and every year around the holidays, my mom would pull out this foreign looking wooden form with nails protruding from it.  I knew exactly what it was for...our annual Colonial Williamsburg style Apple Tree!  She used it as a centerpiece on our Christmas table and as an accent decoration for an entry table.  It always sparked great curiosity and many fabulous comments.  As I grew into an adult, I decided to carry on the same tradition.  


To start you'll need the following:  

1. Apple Cone Form

2. Pineapple
3. 3-4 bags of delicious red apples (or in this case oranges).  


4. Greenery


5. Whole Cloves (if using oranges)


Assembling the Tree


I start by adding oranges or apples from the base of the tree to the top.  It doesn't matter if you put the fruit in rows or staggered, but I would stick to the same pattern throughout.  


Stick the pineapple on the very top of the base.  There will be wholes between the fruit that you will fill in with fresh greenery.  I use anything from boxwood to holly.  

Fill in the bare sections with strips of greenery.  I usually stick the end of the branch towards the bottom and let the leafy tops of the greenery fill in between the fruit.  It can be unruly so you will have to push it between the fruit in places so the fruit can still be seen.  


I added cloves to a few select oranges after the fact.  If i'd had more patience, I would have consistently put them in each and every orange.  


I added some faux berries in between the greenery to add an additional amount of color.  I also used some pink and red ornaments around the base to make the centerpiece seem more Christmas-y.  


The Christmas season was here and gone in a flash and I didn't have time to post this tutorial before Christmas.

I also had the wonderful opportunity of sharing this DIY project on Better Connecticut in early December.  Melissa Cole came to the shop and taped the segment.


Check out the link to the show here

Hope you all enjoyed your holiday season.  Welcome to 2016.
Cheers,

Heather


Thursday, 19 November 2015

How to "Build" Garland


Recently I posted a photo on Instagram displaying my stairway garland.  A few of ya'll wanted to know how to recreate it and I gave a brief description about how I use multiple layers to "build" it.

Today, I'm going to provide more details into my garland process.

The finishing result produces thick glorious garland full of pine cones, berries, lights, leaves and greenery.


The fact that I already have my garland hanging and it's only mid-November should be a tell tell sign that I don't use fresh greenery on the stairs.  My rationale is that it's such a heavily trafficked area so artificial greenery can withstand the traffic and hold up over time.  Plus, I'm able to get a jump start on my seasonal decorations and I know they will last the entire holiday season.

Supplies Needed: 

Here are the ingredients that I use when "building" my garland.  I say BUILD because it truly is a layering and adding process.  (But very simple).  

1. Higher Grade Garland
2. Layering "Roped" Garland with Berries
3. Sprigs and Fillers
4. Lights
5. Garland Ties
6. Extension Cords

1. Select a higher quality garland from your local craft store.  

It should include real pinecones, life-like berries and a few extras such as twigs.  Anything that further enhances the "real" appearance.  It usually retails for $40-100 (but it is ALWAYS 50% off, so you should expect to pay $18-30 per strand.   I used Michael's Celebrate It Winter Naturals $18.


2.  Select a decorative strand of "wrapping" garland.  


By this, I mean the ropes that contain holly and berries.  Or just berries that are strung together.   These ropes are usually located in a separate section away from the greenery.
I found ropes of small berries from Michael's (not pictured here but very similar to the holly with faux berries as seen in this photo).  Again, it is ALWAYS 50% off and will likely run around $7 per rope.


3.  Select fillers and sprigs

This aisle in any craft store is usually the most daunting.  In it's entirety, it's easy to dismiss this aisle as a bunch of tacky and elaborate bins filled with gawdy decorations.  Take time to hone in on each individual bin and picture each sprig on it's own.

Look for life like berries that can be added into your garland.  I always go for the berries that do not have any dazzle, meaning no sparkle or glitter falling off of them.   I try to pick things that look like they could be found in nature.


5. Select Lights

I use white lights.  Make sure they can connect multiple strands together.  The craft stores usually have them discounted and a package of 100 will usually cost around $6.  I always purchase more than I think I will use...and I always need more than I have purchased! 


6.  Garland 

Garland Ties are my LIFESAVER!  They make the job so much easier and are a must.  I use the plastic ties from Lowes (Holiday Living 10-pack Plastic Garland Ties $3.99).  


7. Extension Cords

I usually use one cord at the bottom of the stairs and one at the top for obvious reasons, to plug in the lights! 

Process for Building Garland: 

I wish I had photos of the actual layering process but I didn't capture those.  Still, once you have all of the ingredients, building the garland becomes simple.  

1.  Start with the "higher quality" garland and use the garland ties to affix to the railing.  A few tips: I usually start at the top of the stairs and work down.  I do NOT waste time wrapping the garland in between all of the individual posts.  I line the garland on the top part of the banister and tie the garland ties every 3-4 feet to hold it in place.  (This is the only time I use the garland ties).  

2.  Drape the roped berries on top of the greenery.  Tips: Start at the top of the stairs and work down.   Do not simply lie directly on top.  Attempt to make it appear natural with a "s" shape formation over the greenery garland.  

3. Add Lights.  Determine where the most logical location will be to plug in your lights.  For example, i have an outlet at the bottom of the stairs that is hidden behind a dresser.  My outlet at the top of the stairs is around a corner in the hallway.  Because of this, I wanted my "plug in" location to be at the bottom of the stairs where it will be hidden.  Determine your "start" location accordingly.  (For example, I begin at the top of the stairs so the plug will end up at the bottom).  

 I used to meticulously wrap the lights around the banister between each stair post.  Now, I drape the lights over the top of the greenery in an "S" shape and use the wire from the greenery to "hold" the lights in place.  (Wrap a few of the twigs over the light cord to secure in place).  


4. Add Fillers.  Take the sprigs of berries and pine cones and plug into parts of the garland that appear bare.  You may find that you don't need many fillers by this point.  

5. Ribbon.  I do not add ribbon to my stair banisters but it certainly adds another dimension.  


I find that the end result of this process brings a beautiful and custom appearance.  Of course, the same can be done with fresh greenery!   

Now, I have to resist the temptation to turn on the lights until after Thanksgiving.  It's nice to get a jump start on the decorating, but I have to pretend that we're still singing pumpkins and gourds at our house until December!  

To check out some of Vivid Hue Home's previous Christmas decor, look here:


Check out my live decorating updates on Instagram


Friday, 13 November 2015

Vivid Hue appears on Better Connecticut!


Today we were thrilled to be featured on Better Connecticut with Scott Haney and Kara Sundlun.  Reporter Melissa Cole came for a visit to the shop and we discussed how to create a holiday mantle that will last through the autumn season. 

Impress Your Guests on Thansgiving with these décor tips
To view the segment, click here. 

Next Month, I will be on Better Connecticut again discussing how to make a terrific New England (live) centerpiece!

Vivid Hue Home is open
Tuesday through Friday 930am-5pm 
Saturday and Sunday 10-4pm
We are located at 775 Farmington Ave, Farmington CT  06032


Check out how Vivid Hue Home builds garland for the stairs at Christmas here.


Related Posts Plugin for WordPress, Blogger...