


I have been on a DIY kick lately. This Saturday, I had the morning free before the kids' soccer games kicked in. My husband was at a day conference so I knew I had a very tiny window of time to get the project underway before he got home to put the kibosh on it. (He's very tolerant of anything I want to do around the house, but my recent project of painting my mudroom interior door has turned into "50 Shades of Turquoise." Every time he walks through the door, it's literally a different color. What better way to deal with that never ending process, than to start another project!!!)
The mission...paint my interior kitchen cabinets.

We pseudo use this cabinet in our kitchen. We regularly access our wine glasses from here. And I recently scored the coffee mugs on the left from Home Goods with well intentions of really using them. But this space is not styled. And nothing pops!

My idea to paint the cabinet came from Emily Clark's blog. Not that this is a new concept. But I loved her post about turning her cabinet into open shelving. And I also loved that she painted the back of her cabinetry a dark charcoal color so the items on her shelves popped with flair! So, I decided to use the exact same color as Emily, Sherwin Williams Urbane Bronze.

While the kids were busy doing crafts projects and having a silly morning dance party in their pj's...

I took every last item out of that cupboard. Whew, by the time that was done, I was ready for a glass of wine. Only it was 9am so I thought I should probably hold off a bit.

I was a bit nervous about how the Urbane Bronze would adhere to the bead board...I'm sort of a half a$$ DIY'er. I'm not one for prepping and priming. I'm sort of a jump-right-in-there doer. So if this thing needed to be sanded down to loose some of it's finish, I was NOT the person that was going to be doing it! Instead, I dabbed on one coat. Two coats. Three coats....well, by about 2-3 dabblings, the paint started drying and then I was able to properly brush the coats of paint onto the board.

I think this is coat fifty or sixty...teasing.

One soccer game, two PB&J's, a few quick naps and one trip to Marshalls later, the paint was dry and the styling began.


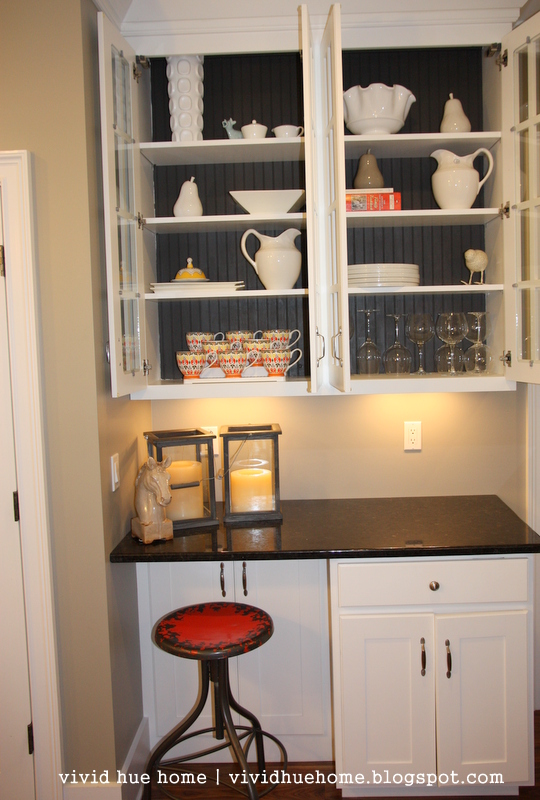
I removed most of the wine glasses and stored them elsewhere. There were so many in there previously and we just didn't need them in there. We're healthy drinkers but, I mean, between my husband and myself we STILL only have four hands. I added mostly white items so there would be a real contrast between the charcoal and the white. I still tried to keep some of the functional items in here too. I'd love to start using these coffee mugs as my every day mugs so I tried to make them easily accessible. (I also used an organizer that's used for soup cans to give them some elevation). The plates on the second shelf are cookware plates that my husband likes to use for our steaks. He can heat them up to about 400 degrees in the oven (and he does) and then he plops the steaks on them and they continue to cook and sizzle. That's all great and nifty but my main concern every single time is what that little cookware plate is doing to our table underneath! We pile about 6 heat resistant place mats under each place setting to prevent damage to the tables. Ah, I guess we each have our "things." I paint cabinets charcoal black. He just about turns our tables charcoal each time we eat a steak!


And I just love when one DIY project spawns another. I've had these lanterns for about a year now. I got them from Home Goods and love them. . I usually use them for outdoor parties. I just love them. Only they've always been mismatched in color. Until now...I dabbed a lil bit o Urbane Bronze on those baby's and now they match.

I scored this chair on Joss & Main and I love the bit of red it gives.


First, I need to convince MC to buy and install glass cabinet doors!
ReplyDeleteHi Heather! This has totally been on my do list for my glass cabinets in the kitchen. Your's came out great!! I've been following your blog since you launched. Love it!!!
ReplyDeleteHi! Great post Heather,love the paint on the interior kitchen cabinet.I want to do the same for my cabinet too as it looks pretty impressive.
ReplyDeleteLooks amazing!
ReplyDeleteLooks great! I also love your butterfly teacups!
ReplyDeleteSounds like we are the same kind of DIYer. Prep work be damned. Looks wonderful! I'm in love with that color!!
ReplyDeleteVery pretty!
ReplyDeletewww.chattafabulous.blogspot.com
I was scared when I saw that streaked paint but never should have doubted you. It looks fabulous!!! I also love all the white on the dark background.
ReplyDeleteI love the gray. Great job.
ReplyDeleteHeather it looks great! Everything shows up now and looks perfect.
ReplyDeleteYou are so funny. I like to jump into something while my husband is out, cause he loves to nix a lot of my ideas, but then ends up liking them when Im done! I love the painted backs and the styling. Those cups are darling. You need some candy corn around your candles right now, or would your kids raid that? My new fall accessory is candy corn. I think I'll do a post about that! hahaha
ReplyDeletexo Nancy
Powellbrowerhome.com
I love how that turned out! I have black painted cabinet interiors with the doors off in my kitchen and I like the contrast of the white dishes against it. That's what you have done. I like that color you chose. It's like a soft black. Love your cute stool from Joss & Main too. That's a great site!
ReplyDeleteOkay, this is kind of irritating me ... because now I am going to have to paint the back of my kitchen cabinets! I was really happy with them ... until now!! They look gorgeous and your white pop makes them even better!! Seriously, I have other things to do right now!!!! xoxo
ReplyDeletekitchen is something different to design than other interior painting of home. it needs to be painted in the different way.
ReplyDeleteIt is good to take some risks sometimes, especially on your DIY project. You may feel a little anxious on what it will look like, but most of the time, the result is more than what you bargain for. And I think you made the right turn in painting your interior cabinets with urbane bronze. The dark paint gives some depth and dimension to the cabinet. Also, it made the pieces more visible even when the cabinet doors are closed.
ReplyDelete[Darryl Margulies]
The black charcoal paint definitely worked wonders on your cabinet. In fact, it made your cabinet elegant. One more advantage of the dark colored background is it made your utensils and glassware more visible from the outside. With the white paint, the utensils blend and disappear in the background of the cabinet. But with the dark paint, you can clearly see the objects inside the shelves. [Anthony Selby]
ReplyDeleteThis turned out great! I really love the dark and white contrast against the pattern cups.
ReplyDeleteYou should check out my DIY link up this week on decor-eat.
Corbin
decor-eat