Showing posts with label Christmas Décor. Show all posts

Saturday, 7 December 2013

Steps for Simple DIY Ornament Wreath


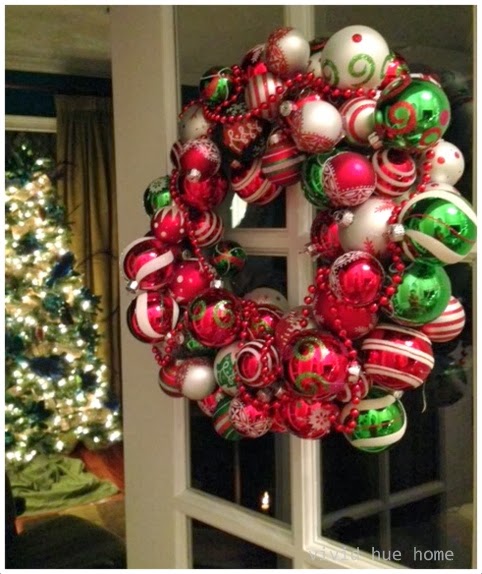
I made an ornament wreath this year.  Two of them.  Easy peasy and so decorative. 


Here are the items required for the wreath:


Steps required to make the ornament wreath:

 I literally started by hot gluing an ornament on each "side" of the circular foam.  I continued by filling in the spaces, working to fit the ornaments together in somewhat of a pattern.  Sort of like fitting puzzle pieces together. 


Over time, most of the surface was populated with ornaments but traces of the green foam still peaked out between. 


I simply continued adding balls on top of each other, almost forming an additional layer of ornaments.  My goal was to hide as much of the green form as possible.  After awhile, it looked like this (below) and I worried that I'd gone over board.  (Nah, the more garish --for me-- the better in the case of this whimsical little wreath). 


 I finished with a string of garland beads and draped them around the wreath.  Any spaces of the original foam were easily hidden by pushing a few beads down the crevices between the ornaments. 
And the finished result was two of these babies:   (only one shown here, but I have them both on these French doors leading into the sunroom).   


A few tips/ lessons learned:

  •  I needed many more ornaments than I originally thought.  I started with about 40 ornaments per wreath and I ended up going back to Michaels to purchase more.  In total, I'd estimate each wreath required about 60 ornaments.

  • In hindsight, I would have wrapped the green foam circle in red ribbon (or ribbon to match the ornaments.  That way, any angles from the side that were left uncovered would be more attractive.  Also, it would require fewer ornaments "layering on top" of each other to hide the circle form. 

This DIY project was super easy with fun results!

For ideas DIY Ornaments, Check out "DIY Felt Ornaments in 10 Minutes

For a tour of Vivid Hue's Home in Christmas-decoration-progress for 2013, check out "Christmas Garland and Tree Tour"

View Vivid Hue Home's 2012 Christmas Tablescape here

Thanks for stopping by.  Hope you're enjoying the holiday season!  If you're new to my blog, please follow me!  I love friends and I follow back. 

Cheers,  Heather |  Vivid Hue Home

Monday, 2 December 2013

Christmas Garland and Tree Tour

 I tell ya, I don't care how early I start every year, the decorating seems endless.  Good thing I love it.  I've been making a trip to the craft store daily for additional lights, garland and berries.  I've managed to tackle the "big stuff" and now have to accessorize the mantles and table tops. 

Here's a glimpse at the stairwells and a few of the trees.  I promise to share more once I get the entire rooms complete!

Garland and lights are on our main stairs with berries.  Our celebration season seems to get longer and longer each year and several years ago I caved and decided to use faux greenery to help supplement my decorating.  It allows me to have Christmas decorations from Thanksgiving through New Year's without worrying about wilting and crackling needles. 

On the other hand, nothing beats the real stuff so as it gets closer to our Christmas party and out-of-town guests arriving, I try to stick in branches of real greenery.  Mmmmm, love the smell of fresh greenery!


We moved into the Somersby house four years ago and I started the tradition then of decorating several rooms with differently themed trees.  For example, in the study, there are peacocks, pheasants and feathers....View non-Christmas photos of the Study here

Vivid Hue Home Study

Vivid Hue Home Pheasants and Peacocks


In the sun room, it's more whimsical with colored balls and glitz and glam.  Completely over the top but I have fun with it.  View other photos of the sun room here.  


The living room has the tree with all of our "meaningful family ornaments."  Whenever we visit a vacation spot or take a family trip, we buy an ornament to remind us of our travels.  View last year's family room at Christmas here.  View the family in it's usual state of décor, here.   

I've tried to get a jump start on the wrapping. 


And I've put garland up the back staircase from the mudroom to the upstairs.  Love the pop of berries against the Meg Braff green wallcovering! 

View the mudroom in it's non-seasonal state, here


I still have plenty of work left to do.  I will use fresh greenery on the fireplace mantles and consoles.  I also add it in key locations (e.g. dining room) with a centerpiece.  View the dining room with last year's Christmas tablescape, here

I'll continue to share my progress and take you on the Vivid Hue Christmas Home Tour. 


How are you coming with your holiday decorations?  Do you have a themed tree?  Do you use fresh greenery?  Do you use gold flatware when you decorate your holiday table?  Are you hosting this year!?


Learn how to make DIY Felt Ornaments in Ten Minutes. 

Thanks for stopping by and I love new followers so please follow me via any of the social media outlets below or via the Google Connect section on the left side of the blog. 

Cheers!  Heather   Vivid Hue Home 

Sunday, 1 December 2013

DIY Felt Ornament in 10 Minutes


These DIY Felt Ornaments were quick and easy to make and they added so much punch and color to the tree.  The kids made their own and they turned out beautifully! 
It took us about ten minutes per our own ornament. 

Here are the supplies needed:  


1. Long Pearlized Push Pins (any push pin would work but the pearlized tips on the end of these added to the decoration of the finished ornament). 
2.  Styrofoam Ball (I purchased a package of 6)
3. Felt Sheets (I purchased them individually from Michaels at 33 cents a sheet so that I could select the colors I wanted.  Only used a portion of each sheet). 


Here are the steps:

1.  Cut felt into tiny squares.  They do not need to be the exact same size. 
2.  Pin a square to the ball, moving around the ball until all white areas are covered.  We started out trying to make the squares in a row but then switched pushing the pins right in the middle of each felt piece. 


3.  End result, there will be fabric pieces overlapping each other. 
 
4.  Cut a ribbon about 8 inches long.  Pin the ends to the top of the ball to make the ornament hanger.


5.  Hang on tree! 


There are simple and easy to do, and even a fun activity for the kids.  Have you made any DIY Holiday Decorations yet? 

Tour Vivid Hue's Christmas Home Decorations, here.

Cheers!  Heather |  Vivid Hue Home

Related Posts Plugin for WordPress, Blogger...